🏠 Home → Knowledge Base → ST-LINK
¶ ST-LINK Firmware Flashing Guide
¶ Required Equipment
- ST-LINK programmer (v2 or v3)
- 20-pin cable
- ROSSMA IIOT-AMS device
- PC with STM32 ST-LINK Utility installed
¶ System Requirements
Computer requirements:
- Windows 7 SP1 / 10 / 11 (32-bit or 64-bit)
- 512 MB RAM (2 GB recommended)
- 100 MB free disk space
- USB 2.0 port (USB 3.0 supported)
¶ Software
STM32 ST-LINK Utility (version 4.6.0 or higher)
- Download: st.com/st-link-utility
- Size: ~25 MB
- ST-LINK v2 drivers install automatically
Please note: STM32 ST-LINK Utility is deprecated. STMicroelectronics recommends using STM32CubeProgrammer for new projects. However, ST-LINK Utility still works correctly for flashing ROSSMA devices.
Alternative: STM32CubeProgrammer (v2.0+)
¶ Drivers
When connecting the ST-LINK programmer for the first time, Windows will automatically install drivers. If automatic installation fails:
- Download drivers: STSW-LINK009
- Extract archive
- Run
dpinst_amd64.exe(for 64-bit) ordpinst_x86.exe(for 32-bit) - Follow installer instructions
¶ Step-by-Step Instructions
¶ Step 1: Connect Programmer
- Connect ST-LINK programmer to computer via USB
- Connect 20-pin cable to programmer
- Ensure correct orientation: numbering on programmer side (view from top)
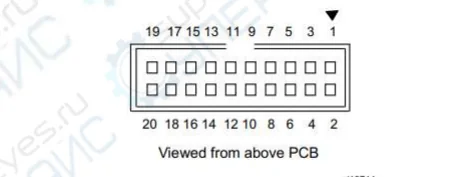
Warning! Incorrect connection may damage the device.
¶ Step 2: Connect to ROSSMA Switch
- Remove ROSSMA switch cover
- Locate programming connector on motherboard
- Connect 20-pin cable to programming connector
- Ensure secure connection
¶ Step 3: Launch STM32 ST-LINK Utility
- Launch STM32 ST-LINK Utility on computer
- In menu select Target → Connect
- Verify program successfully connected to device
- If connection error occurs - check cable and device power
¶ Step 4: Load Firmware File
- In menu select File → Open file...
- Select firmware file (.hex or .bin) for your device
- Verify correct firmware file selected for your switch model
CRITICAL! Using incorrect firmware file may render device inoperable.
¶ Step 4.5: Verify File Integrity (Recommended)
Tip: Before flashing, it's recommended to verify file checksum to ensure integrity and absence of download corruption.
¶ Method 1: Verification via STM32 ST-LINK Utility
- After opening file, look at status bar at bottom of window
- Check file size - it should match size from documentation
- Start Address should be
0x08000000
¶ Method 2: Checksum Verification via Command Line
Open Windows Command Prompt and execute:
certutil -hashfile path\to\file\firmware.hex SHA256
Example:
certutil -hashfile C:\Downloads\ROSSMA_v1.5.2.hex SHA256
Program will output file hash. Compare result with checksum from README file or data provided by ROSSMA technical support.
If checksums don't match - file was corrupted during download. Download firmware file again!
¶ Step 5: Program Device
- In menu select Target → Program & Verify...
- In opened window verify parameters:
- Firmware file path
- Start address (usually 0x08000000)
- Options: Verify after programming (recommended)
- Click Start button
- Wait for flashing process to complete
Figure 1. Program & Verify dialog with flashing parameters

¶ Step 6: Verification
- After successful flashing, program will display verification success message
- In menu select Target → Disconnect
- Disconnect programmer from device
- Replace switch cover
- Apply power to device
- Verify device operation
Successful flashing! After verification, device is ready for operation. Check LED indication after powering on.
¶ Troubleshooting
¶ Programmer Won't Connect to PC
Symptoms:
- Programmer not detected in Device Manager
- ST-LINK Utility doesn't see programmer
- LED on programmer not lit
Solutions:
-
Check USB cable and port
- Try different USB port (preferably directly on motherboard, not via hub)
- Try different USB cable
- USB 2.0 ports preferred (fewer compatibility issues)
-
Reinstall ST-LINK drivers
- Open Device Manager (Win+X → Device Manager)
- Find unrecognized device or "STMicroelectronics STLink"
- Right-click → Uninstall device
- Disconnect and reconnect programmer
- Drivers will install automatically
-
Update ST-LINK programmer firmware
- Download STSW-LINK007
- Run STLinkUpgrade.exe
- Click "Device Connect"
- Click "Upgrade" if new version available
Tip: If programmer still not detected, try on another computer to rule out hardware fault.
¶ Cannot Connect to ROSSMA Device
Symptoms:
- ST-LINK Utility shows error when attempting connection
- "Can not connect to target"
- Error 0x8001 or similar
Solutions:
-
Check cable connection to device
- Ensure 20-pin cable correctly oriented
- Verify secure connection (cable should be firmly inserted)
- Check cable for damage
-
Check device power
- Device must be powered (battery connected)
- Battery voltage must be at least 3.0V
- Check LED indication on device
-
Try Connect Under Reset mode
- In ST-LINK Utility: Settings → Reset Mode → "Connect Under Reset"
- This helps if device is in low power mode
-
Check connection settings
- Target → Settings
- Mode: "Normal"
- Reset Mode: "Software system reset"
- Frequency: 4000 kHz (or lower if issues occur)
¶ ST-LINK Error Codes
| Code | Problem | Solution |
|---|---|---|
| 0x8001 | Cannot connect to target device | • Check cable and orientation • Check device power • Try Connect Under Reset |
| 0x8002 | Target device locked (protection) | • Perform Mass Erase via Target menu • WARNING: Will erase all data! |
| 0x8003 | Target device busy | • Close other programs using ST-LINK • Restart ST-LINK Utility |
| 0x8004 | SWIM connection error | • Not applicable to STM32, used for STM8 |
| 0x8005 | No response from target device | • Verify device is powered on • Reduce connection frequency to 950 kHz |
| 0x8007 | Verification error after programming | • Repeat flashing • Check firmware file (checksum) • Perform Full Chip Erase before flashing |
| 0x8009 | Cannot halt core | • Press RESET button on device • Use Hardware Reset instead of Software |
If error not listed in table, take screenshot and contact ROSSMA technical support with full error text.
¶ Programming Error
Symptoms:
- Flashing process starts but aborts with error
- "Programming error"
- Verification fails
Solutions:
-
Verify firmware file integrity
- Use checksum verification (see Step 4.5)
- Download firmware file again from official source
-
Perform Full Chip Erase
- Target → Erase Chip
- Wait for operation to complete
- Repeat flashing
WARNING! Full Chip Erase will delete all information from device memory, including calibration data (if stored in main memory). For ROSSMA devices this is safe, as calibration is stored separately.
-
Ensure correct file is used
- Verify device model
- Check firmware version (must be compatible)
-
Reduce programming speed
- Settings → Frequency → set 950 kHz instead of 4000 kHz
- Slower but more reliable
¶ Flashing Interrupted During Process
Situation: During flashing, power was lost, cable disconnected, or program froze.
DON'T PANIC! Device can be recovered. STM32 microcontroller is protected from bricking.
Recovery steps:
-
DO NOT disconnect programmer and DO NOT remove power
-
If ST-LINK Utility froze:
- Open Task Manager (Ctrl+Shift+Esc)
- End STLinkUtility.exe process
- Launch program again
-
Perform full memory erase:
- Target → Connect (if won't connect, use Connect Under Reset)
- Target → Erase Chip
- Wait for "Erase memory successfully" message
-
Flash device again:
- File → Open file (select correct firmware file)
- Target → Program & Verify
- Must enable "Verify after programming" option
- Start
-
Verify result:
- Verification should complete successfully (100%)
- After disconnecting programmer, device should work
If recovery failed after 2-3 attempts - contact ROSSMA technical support. May require special recovery via SWD debugger.
¶ Device Not Working After Flashing
Symptoms:
- Flashing completed successfully, verification OK
- But device won't turn on or doesn't work correctly
- LEDs don't blink or blink incorrectly
Solutions:
-
Verify firmware version
- Ensure firmware file is intended for your device model
- ROSSMA IIOT-AMS Analog ≠ ROSSMA IIOT-AMS ESD (different firmware!)
-
Check supply voltage
- Voltage should be 3.6V ± 0.3V
- If battery discharged (< 3.0V), replace it
-
Check indication after flashing
Normal indication:
- ACT LED: blinks at transmission interval (e.g., once per 15 minutes)
- LoRa LED: briefly lights up when transmitting data
Error indication:
- Error: blinks once per second → communication module not found
- 3 times - pause - 3 times: cannot register on network
- 5 times - pause - 5 times: error sending data to server
-
Perform settings reset (if available)
- Some models have RESET button
- Press and hold for 3-5 seconds
-
Flash device again
- Perform Full Chip Erase
- Flash again with verification
- Ensure correct file is used
-
Check device configuration
- May require configuration via ROSSMA Configurator
- Check DevEUI, AppEUI, AppKey for LoRaWAN
If device still not working, contact ROSSMA technical support with:
- Device model (exact name)
- Firmware version (file name)
- Device serial number
- Problem description and LED indication
¶ Obtaining Firmware Files
Current firmware files for ROSSMA IIOT-AMS devices available:
- On official website rossma.ru
- By request from technical support
- In Documentation section
¶ Technical Support
If problems occur with flashing, contact:
- Email: info@rossma.ru
- Phone: +7 342 233 93 99
- Telegram: @rossma_ru
Additional information: